Author Archives: adisimon
Google Chrome Offline installer
I always use Google Chrome for Web development, simply because it is way better than IE and offers a lot more tools and plug-ins. However, especially with SharePoint development, sometimes internet connectivity or proxy settings prevent you from acquiring Chrome using its web installer.
So the workaround is to download the official Standalone installer for Google Chrome (about 30MB)
SharePoint Development VM on Azure
If you are a working with SharePoint chances are you have an MSDN subscription and that is good news. You get a free USD200 worth of Windows Azure credit the first month you sign up for the trial and monthly credit according to your subscription level as per the following MSDN offer.
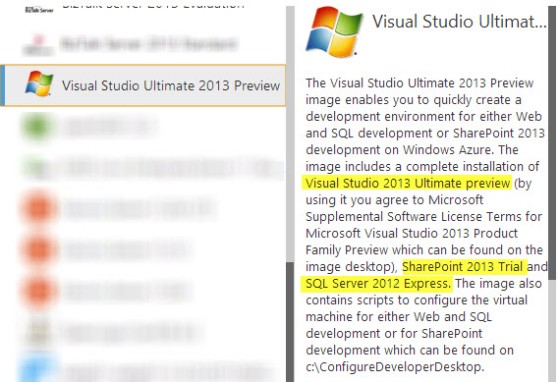
SharePoint 2013 demands hardware that many does not have on their local machine, yes? So naturally one would think about having a development VM that one can simply connect to, and for that you have come to the right place. Recently Microsoft have made available Visual Studio 2013 preview and with that, we see that we can now create a Visual Studio Ultimate 2013 Preview VM on Azure that apparently has SharePoint 2013 Trial on it.
If you have not already, sign up for Windows Azure Trial or activate your Windows Azure subscription from your MSDN subscription benefits.
If this is your first time with Windows Azure, you will need to configure a few basic things to be able to provision your VM properly. For this, Keith Mayer have an excellent blog entry that tells you what you need. Make sure you follow the instructions in his blog before creating your Development VM.
To create your VM, simply click on the New icon at the bottom of the Windows Azure management portal page then choose Compute > Virtual machine > From Gallery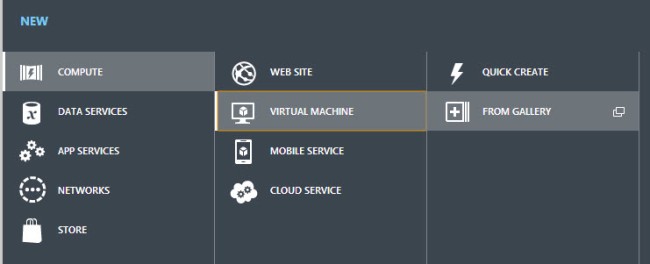
Pick Visual Studio Ultimate 2013 Preview from the list and give it a name. I recommend choosing the Extra Large instance for this, although Large instance should be the minimum.
After the virtual machine is provisioned, simply go to Virtual Machines (from left menu), then pick your newly created VM and click on Connect on the bottom of the page to download an RDP file. Log in with the credentials you specified when creating the VM and have a good time.
Windows error 0x800F0906 while enabling IIS on Windows 8 RTM
While enabling IIS on Windows 8 RTM, it prompted me for retrieving files from Windows update, so I clicked it and kept getting stuck with windows error 0x800F0906.
The answer is simple, thanks to this Technet thread. You basically have to do the following:
1. Mount your Windows 8 image, take note of the drive letter
2. Open command prompt with administrator privileges and run the following command, replacing the <drive_letter> with your win 8 mounted image drive letter:
dism.exe /online /enable-feature /featurename:NetFX3 /Source:<drive_letter>:\sources\sxs
For example, if your drive letter is G, then the command above would look like:
dism.exe /online /enable-feature /featurename:NetFX3 /Source:G:\sources\sxs
This would first install .NET 3.5, after the operation has completed you can go back to control Panel > Programs > Turn windows features on or off and happily enable IIS.
Is Duet Enterprise Workflow the weakest link?
Duet Enterprise FP1, as great as it sounds, forms a glue between Microsoft and SAP. This blog post talks about how Duet Enterprise workflow may be the weakest link of features that comes with Duet Enterprise.
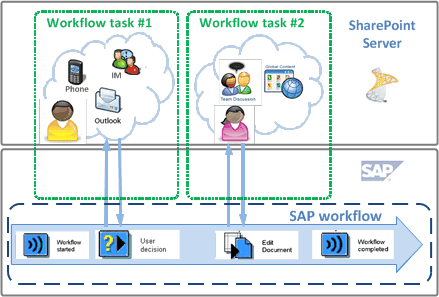
In a nutshell, workflow in Duet Enterprise is implemented as two-way communication between SharePoint and SAP Netweaver Gateway. End users in SharePoint see workflow tasks with action buttons, nothing different from the way they would approve or reject a sharepoint workflow task, because it is a sharepoint workflow task. All great and good, but under the covers, implementation is not as elegant as it look.
Workflows in Duet Enterprise are exposed per user-decision interaction step, more simply, this is the diamond shapes in a workflow sketch. At its plain configuration, each one of this interaction step is mapped as a subsite which hosts workflow task for this ‘type’ in SharePoint side. Yes, one step – one subsite.
Source: Plan for SAP workflow tasks for Duet Enterprise
This would mean that administrators and developers would need to maintain a list of user decision points which has been exposed. For SAP, it means at any time when any of these decision points change, they may need to reconfigure workflow pattern customizations and/or filters. Then all changes would need to be captured and documented clearly and handed over to SharePoint administrators and/or developers.
On the SharePoint side, Microsoft seems to be missing a few core operations that make this maintenance even harder. A workflow task type is configured in SharePoint by specifying task type and outcomes as they appear in SAP. For example, task of type CampaignApproval has been configured with outcomes Approve=001 and Reject=002.
When the scenario where additional outcome has been configured on SAP side (eg. Revision Required=003), this CampaignApproval subsite has to be reconfigured in SharePoint, which is fair. Question is, how?
1. Deleting the workflow subsite will not work, because then the workflow parent site still thinks that the workflow type is still configured and render the task not usable, and we won’t be able to create a task with the same name either.
2. Changing the outcomes in sharepoint designer and republish workflow might work, but really?
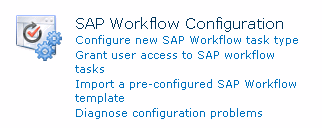
There are few options provided in the site actions menu, but it looks like when one is configured, there is no way of reversing it, modifying it and clean it up properly without destroying the whole site altogether.
I am puzzled indeed. May look into doing it programmatically next, but certainly Microsoft, I wonder if this has been thought through?
Must have tools for BCS development
Creating a BCS model and external list with SharePoint Designer 2010 makes things a breeze: just few clicks and we are done, but this typically does not work in development environment. Why? Simply because we need to package this up, and to package this up, we need to be able to extract the BCS artifacts into a Visual Studio solution.
Well, lucky that there are tools for that, check out this blog post by Russell Palmer. These tools are:
Writing to event log and ULS in Sharepoint 2010
No logging means no visibility
Logging is a prime and most basic feature that any software need to have, and there are many ways to implement logging. In this post, I will illustrate a way to implement logging to windows application event log and/or the ULS when developing custom sharepoint 2010 solutions.
The assumption here is that the solution will be deployed as a farm solution.
A log entry can have various attributes or properties, but most likely we would want to use the following attributes:
- Source
- Severity
- Correlation ID
- Message
When writing to the application event log, it is advisable to create the event sources beforehand. Identify your event sources that you want to use and create these sources, one way is to use the script in this post.
Typically I would advise against logging to the application event log on production systems, for sharepoint solutions, use the ULS, but alas, reading ULS every time things goes wrong can be time consuming, yeah we have great tools like the ULS viewer, but it is still not as easy to read as the event viewer. Therefore, I typically write my logs to the application event log on my DEV machine.
For this, I need a switch that enables me to direct all my log entries to the application event log, the ULS, or both (or other sources). Astute .NET developers would probably think of Enterprise Library when it comes to this scenario. Yes EntLib is collection of great components, but if all we want is a simple logger that writes to two sources, we might as well write common logic and be done in 30 minutes or less rather than trying to bake in and configure EntLib, think about the web.config changes you have to do with EntLib.
For me, my switch is simply a couple of constants in a static class:
namespace Department.Solution.Common
{
    public static class Constants
    {
        public static class AppSettings
        {
            public const bool LOG_TRACE = true;
            public const bool LOG_EVENTLOG = true;
        }
    }
}
We should also ideally put our event sources in constants:
namespace Department.Solution.Common
{
    public static class Constants
    {
        public static class LogSource
        {
            public const string LOGSRC_COMMON = "ProductXYZ Common";
            public const string LOGSRC_WEBPART = "ProductXYZ WebParts";
        }
    }
}
Then I have these methods in my common logger class to write to event log and/or the ULS depending on those flags:
private static void WriteToTrace(Guid correlationGuid, string source, string message, EventLogEntryType entry)
{
    if (!Constants.AppSettings.LOG_TRACE) return;
    var diagSvc = SPDiagnosticsService.Local;
    var traceSeverity = TraceSeverity.Unexpected;
    var evtSeverity = EventSeverity.Error;

    switch (entry)
    {
        case EventLogEntryType.Information:
        case EventLogEntryType.FailureAudit:
        case EventLogEntryType.SuccessAudit:
            traceSeverity = TraceSeverity.Verbose;
            evtSeverity = EventSeverity.Information;
            break;
        case EventLogEntryType.Warning:
            traceSeverity = TraceSeverity.Medium;
            evtSeverity = EventSeverity.Warning;
            break;
        default:
            traceSeverity = TraceSeverity.Unexpected;
            evtSeverity = EventSeverity.Error;
            break;
    }
    SPSecurity.RunWithElevatedPrivileges(() =>
        diagSvc.WriteTrace(0,
        new SPDiagnosticsCategory(source, traceSeverity, evtSeverity), traceSeverity,
        "Correlation Guid {0}: {1}", new object[] { correlationGuid.ToString("B"), message })
    );
}

private static void WriteEventLogEntry(Guid correlationGuid, string source, string message, EventLogEntryType entry)
{
    if (!Constants.AppSettings.LOG_EVENTLOG) return;
    SPSecurity.RunWithElevatedPrivileges(() =>
            {
                var appLog = new EventLog { Source = source };
                appLog.WriteEntry(string.Format("Correlation Guid {0}{1}{2}", correlationGuid.ToString("B"), System.Environment.NewLine, message), entry);
            });
}
Simply put wrappers and overrides around these two methods, for example:
public static string LogError(string source, string format, params object[] args)
{
    return LogError(source, string.Format(format, args));
}
public static string LogError(string source, string message)
{
    Guid correlationGuid = Guid.NewGuid();
    WriteEventLogEntry(correlationGuid, source, message, EventLogEntryType.Error);
    WriteToTrace(correlationGuid, source, message, EventLogEntryType.Error);
    return correlationGuid.ToString();
}
Then whenever you want to log anything, simply call the public method and pass in your source string in one line (for example, if the logger is implemented within your custom LoggerInstance class):
LoggerInstance.LogError(Constants.LogSource.LOGSRC_WEBPART, "Woops, web part {0} errored out!", webPart.Title);
Logging would be a breeze if you have this helper class, because it simply provide a layer of abstraction.
Viewing XML data on Content by Query Web Part (CQWP)
How many times have you been tasked to customize a Content by Query Web Part in SharePoint? In my case, this task often involves customizing the XSL used by the web part. The pain is, without knowing the data we are working with, we are basically trying to aim our arrows in darkness.
If we can see the data (ie, XML) that we are dealing with, then it would become much easier to write an XSL that achieves what we want. This post aims to give you a way to dump out the XML content of the content query web part to allow you to visualize what you are working with.
To do this, first step is to download a copy of the default xsl that all CQWP uses, this usually exist in Style Library/XSL Style Sheets subfolder and is called ContentQueryMain.xsl
Download this to your local folder now, and rename it as something else, eg. ContentQueryDump.xsl
Now open the ContentQueryDump.xsl file in your favourite XSL editor or text editor, and locate the template root node
Change the inner XML of this node to dump out the xml content by surrounding it in TEXTAREA tag
<xsl:template match="/">
    <TEXTAREA style="width:200px;" rows="10">
        <xsl:copy-of select="*"/>
    </TEXTAREA>
</xsl:template>
Save this file, and upload it to the Style Library within the XSL Style Sheets folder.
Now picture this: I have a custom list in my site that contains 2 custom columns, and I want a Content by Query Web Part to display data on this list according to the XSL that I specify.
I set up a content by query web part on my home page, set the query scope to my custom list, and this is what I get:

Let us take this web part and dump its XML data on screen. Export the web part from your page, and save it locally:

Crack it open in your favourite XML Editor or text editor, then locate the property node with name attribute of MainXslLink. Put the reference to the xsl file you uploaded earlier, as follows:
<property name="MainXslLink" type="string">
    /Style Library/XSL Style Sheets/ContentQueryDump.xsl
</property>
Save this .webpart file, then import and add this web part to the page
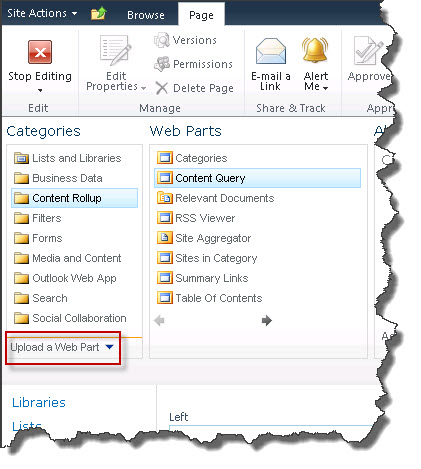

The result is as follows:
And voila! You have your content result XML, this is what your XSL will be looking at. You can see all the attributes, which makes things much easier from here onwards.
<dsQueryResponse>
  <Rows>
    <Row Title="Item 3" FileRef="/Lists/MyList/3_.000" Author="George Lucas" Editor="George Lucas" FSObjType="0" PermMask="0x400000300c231061" ProgId="" File_x005F_x0020_Type="" File_x005F_x0020_Size="" PublishingRollupImage="" Comments="" ID="3" Modified="2011-11-02 11:33:02" Created="2011-11-02 11:33:02" _Level="1" WebId="bf499d62-67d5-46af-9746-acd74885fa45" ListId="19877173-9e7a-4543-962b-c4dc4261aceb" _x007B_94f89715_x002D_e097_x002D_4e8b_x002D_ba79_x002D_ea02aa8b7adb_x007D_="Lists/MyList/3_.000" PubDate="Wed, 02 Nov 2011 00:33:02 GMT" FileExtension="" FileSize="" DocumentIconImageUrl="/_layouts/IMAGES/icgen.gif" LinkUrl="http://localhost/Lists/MyList/3_.000" Style="Default" GroupStyle="DefaultHeader" __begincolumn="True" __begingroup="False"></Row>
    <Row Title="Item 2" FileRef="/Lists/MyList/2_.000" Author="George Lucas" Editor="George Lucas" FSObjType="0" PermMask="0x400000300c231061" ProgId="" File_x005F_x0020_Type="" File_x005F_x0020_Size="" PublishingRollupImage="" Comments="" ID="2" Modified="2011-11-02 11:32:47" Created="2011-11-02 11:32:47" _Level="1" WebId="bf499d62-67d5-46af-9746-acd74885fa45" ListId="19877173-9e7a-4543-962b-c4dc4261aceb" _x007B_94f89715_x002D_e097_x002D_4e8b_x002D_ba79_x002D_ea02aa8b7adb_x007D_="Lists/MyList/2_.000" PubDate="Wed, 02 Nov 2011 00:32:47 GMT" FileExtension="" FileSize="" DocumentIconImageUrl="/_layouts/IMAGES/icgen.gif" LinkUrl="http://localhost/Lists/MyList/2_.000" Style="Default" GroupStyle="DefaultHeader" __begincolumn="False" __begingroup="False"></Row>
    <Row Title="Item 1" FileRef="/Lists/MyList/1_.000" Author="George Lucas" Editor="George Lucas" FSObjType="0" PermMask="0x400000300c231061" ProgId="" File_x005F_x0020_Type="" File_x005F_x0020_Size="" PublishingRollupImage="" Comments="" ID="1" Modified="2011-11-02 11:32:30" Created="2011-11-02 11:32:30" _Level="1" WebId="bf499d62-67d5-46af-9746-acd74885fa45" ListId="19877173-9e7a-4543-962b-c4dc4261aceb" _x007B_94f89715_x002D_e097_x002D_4e8b_x002D_ba79_x002D_ea02aa8b7adb_x007D_="Lists/MyList/1_.000" PubDate="Wed, 02 Nov 2011 00:32:30 GMT" FileExtension="" FileSize="" DocumentIconImageUrl="/_layouts/IMAGES/icgen.gif" LinkUrl="http://localhost/Lists/MyList/1_.000" Style="Default" GroupStyle="DefaultHeader" __begincolumn="False" __begingroup="False"></Row>
  </Rows>
</dsQueryResponse>
Using BackgroundWorker to get around non-responsive UI
Think about this scenario: you are developing windows forms application, there is a button, when clicked, the whole application stopped responding, because it is doing something heavy in the background. Sounds familiar? This is most typical when user demands the application to show status message when a process is running, or to show progress status when a process is running, while keeping the UI responsive.
As we all know it, the easiest way of implementing logic behind a button is to use the OnClick event handler, but if we expect a process to take more than a second, then we might want to rethink whether or not it should be executed on the UI thread. Yes, thread – and first reaction I often get is “oh no! that can of worms!”. OK let me give you a mentality standpoint here, developers who run away from learning core concepts and new technologies should just get another job and click on get off my lawn.
If you are still here, congratulations, you are about to find out a very simple way of implementing threading in WinForm. For the purpose of this, I will be using a very simple Winform app. This is not the evil Application.DoEvents, which I stay away from.
When the Go button is clicked, it will simulate a time-consuming routine by counting from 1 to 10, pausing every second in between counts. As it counts, it will report its progress on the progress bar.
When the Add button is clicked, it simply increments the value next to it.
What we notice is that when the go button is clicked, clicking on the Add button will not increment the value, which shows that the UI is not responsive.
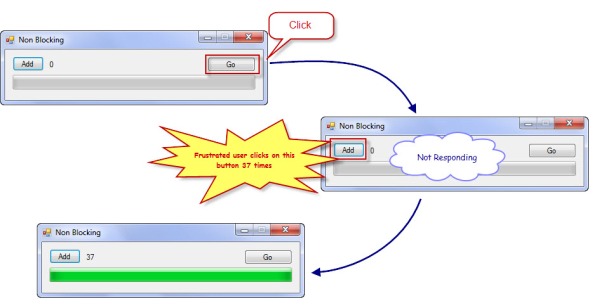
What we want is a responsive UI, so when the Go button is clicked, it does not affect other parts of the form. So let’s get our hands dirty by first creating this simple app in few simple steps:
- Open Visual Studio, create a Winform app
- Put a button, name it btnAdd, double click on it to allow Visual Studio to generate a click event handler method for you
- Put a label next to btnAdd, name it lblValue
- Put a button, name it btnGo, double click on it to allow Visual Studio to generate a click event handler method for you
- Put a progress bar, name it progressBar, set the maximum to 10
- Go to source view and paste in the following code
private void btnAdd_Click(object sender, EventArgs e)
{
    lblValue.Text = (int.Parse(lblValue.Text) + 1).ToString();
}
private void btnGo_Click(object sender, EventArgs e)
{
    btnGo.Enabled = false;
    TimeConsuming(progressBar.Maximum);
    btnGo.Enabled = true;
}

private void TimeConsuming(int maxValue)
{
    for (int i = 1; i     {
        progressBar.Value = (int) ((i / (double)maxValue) * progressBar.Maximum);
        Thread.Sleep(new TimeSpan(0, 0, 1));
    }
}
And Voila! we have just created an unresponsive app 🙂
Now let us enhance this. Drag a  (BackgroundWorker) component from the toolbox onto the form, name it bgw.
Pay attention to the properties of the bsw control. This is what we will use to execute our time-consuming code. Because I want to report back to the UI thread during processing, I need to set the bgw.WorkerReportsProgress property to true.
Now switch to the events for the bsw component. Double click on each of the event (DoWork, ProgressChanged and RunWorkerCompleted) to let Visual Studio generate the event handler methods for you. We will implement these methods later, but for now, here is a brief overview:
private void bgw_DoWork(object sender, DoWorkEventArgs e)
{
    //your time consuming process goes here
}

private void bgw_ProgressChanged(object sender, ProgressChangedEventArgs e)
{
    //thigs which should happen when the worker thread reports a progress
}

private void bgw_RunWorkerCompleted(object sender, RunWorkerCompletedEventArgs e)
{
    //things which should happen when the worker thread completes
}
Let us refactor the code that handles the button click event. We will make it run a worker thread instead of calling the time consuming routine, and make the DoWork method call the time consuming routine. Also remember to take out the line that enables the button.
private void btnGo_Click(object sender, EventArgs e)
{
    btnGo.Enabled = false;
    if (!bgw.IsBusy)
        bgw.RunWorkerAsync(progressBar.Maximum);
}

private void bgw_DoWork(object sender, DoWorkEventArgs e)
{
    TimeConsuming(bgw, (int)e.Argument);
}
Because the TimeConsuming routine now does not report progress directly to the UI, we will have to modify it a little bit, making it to report its progress to the worker thread instead:
private void TimeConsuming(BackgroundWorker worker, int maxValue)
{
    for (int i = 1; i     {
        worker.ReportProgress((int)((i / (double)maxValue) * 100));
        Thread.Sleep(new TimeSpan(0, 0, 1));
    }
}
The rest is simple: Whenever the progress changed is reported, we simply update the value of progress bar based on percentage reported and when the worker thread completes, we enable the go button:
private void bgw_ProgressChanged(object sender, ProgressChangedEventArgs e)
{
    progressBar.Value = (int)((e.ProgressPercentage / 100.0) * progressBar.Maximum);
}

private void bgw_RunWorkerCompleted(object sender, RunWorkerCompletedEventArgs e)
{
    btnGo.Enabled = true;
}
Here is the complete source code of the form, the original TimeConsuming method have been renamed to TimeConsumingOnUIThread for the ease of testing in case we need to switch back to the old scenario:
public partial class Main : Form
{
    public Main()
    {
        InitializeComponent();
    }

    private void btnAdd_Click(object sender, EventArgs e)
    {
        lblValue.Text = (int.Parse(lblValue.Text) + 1).ToString();
    }

    private void btnGo_Click(object sender, EventArgs e)
    {
        btnGo.Enabled = false;
        if (!bgw.IsBusy)
            bgw.RunWorkerAsync(progressBar.Maximum);
        //TimeConsumingOnUIThread(progressBar.Maximum);
        btnGo.Enabled = true;
    }

    private void TimeConsumingOnUIThread(int maxValue)
    {
        for (int i = 1; i         {
            progressBar.Value = (int)((i / (double)maxValue) * progressBar.Maximum);
            Thread.Sleep(new TimeSpan(0, 0, 1));
        }
    }

    private void TimeConsuming(BackgroundWorker worker, int maxValue)
    {
        for (int i = 1; i         {
            worker.ReportProgress((int)((i / (double)maxValue) * 100));
            Thread.Sleep(new TimeSpan(0, 0, 1));
        }
    }

    private void bgw_DoWork(object sender, DoWorkEventArgs e)
    {
        TimeConsuming(bgw, (int)e.Argument);
    }

    private void bgw_ProgressChanged(object sender, ProgressChangedEventArgs e)
    {
        progressBar.Value = (int)((e.ProgressPercentage / 100.0) * progressBar.Maximum);
    }

    private void bgw_RunWorkerCompleted(object sender, RunWorkerCompletedEventArgs e)
    {
        btnGo.Enabled = true;
    }

}
